i-Pilot Remote Instructions: A Comprehensive Guide
This guide details the Minn Kota i-Pilot remote, simplifying boat control for anglers․ It covers pairing, operation, advanced features like Spot-Lock, and troubleshooting․
The i-Pilot system offers self-driving capabilities and precise boat positioning․ Learn to maximize your fishing experience with this comprehensive resource․
The i-Pilot system represents a significant advancement in electric trolling motor control, designed to enhance the angling experience․ Minn Kota’s i-Pilot allows for precise boat maneuvering and automated features, freeing anglers to focus on fishing․
This system, controllable via the i-Pilot remote, offers functionalities like autopilot, Spot-Lock, and advanced speed control․ It seamlessly integrates with compatible Minn Kota motors and, often, Humminbird fishfinders through the OneBoat Network․ Understanding the i-Pilot system is key to unlocking its full potential and enjoying a more productive time on the water․
What is i-Pilot and i-Pilot Link?
i-Pilot is Minn Kota’s original GPS-enabled trolling motor control system, offering features like autopilot, Spot-Lock, and pre-set routes controlled via a dedicated remote․ i-Pilot Link builds upon this foundation by adding smartphone control and enhanced connectivity․
i-Pilot Link integrates with the Humminbird fishfinder and the OneBoat Network, allowing control through your fishfinder’s touchscreen․ Both systems provide precise boat positioning and automated steering, but i-Pilot Link offers greater flexibility and integration with other marine electronics․
Benefits of Using an i-Pilot Remote
The i-Pilot remote delivers unparalleled control and convenience on the water․ Enjoy hands-free operation with autopilot and maintain position effortlessly using Spot-Lock, freeing you to focus on fishing․ Precise speed and steering adjustments are readily available, enhancing maneuverability․
Remote Lock adds a layer of security, preventing unauthorized use․ Integration with Humminbird and OneBoat Network streamlines operation; Ultimately, the i-Pilot remote elevates the angling experience, maximizing efficiency and enjoyment․
Initial Setup and Pairing
Before using your i-Pilot remote, ensure your Minn Kota motor is properly installed and connected to a 12-volt power source․ Begin by turning on the motor․ Press and hold the Home button on the remote until the screen illuminates, initiating the pairing process․
Navigate to the System Menu and select “Pair Remote․” Follow the on-screen prompts; the remote will search for compatible motors․ Successful pairing is indicated by a confirmation message on the display․ Refer to your motor’s manual for specific instructions․

Turning On the i-Pilot Remote
Activating the i-Pilot remote is straightforward․ Locate the Home button, typically positioned prominently on the remote’s face․ Press and hold this button until the LCD display screen illuminates․ This process initiates the remote’s internal systems and establishes a connection with the motor․
A successful power-on is confirmed by the Minn Kota logo appearing on the screen․ If the screen remains blank, verify the remote’s battery level and ensure it’s adequately charged․ A fully charged remote ensures reliable operation during your fishing trip․
Pairing the Remote with Your Minn Kota Motor
Pairing establishes communication between the i-Pilot remote and your Minn Kota electric motor․ Begin by ensuring your motor is powered on․ Navigate to the “System Menu” on the remote using the up/down arrow buttons, then select it with the OK (checkmark) button․
Within the System Menu, locate the “Pair Remote” option and initiate the pairing process․ The motor will enter pairing mode; follow the on-screen prompts․ Successful pairing is indicated by a confirmation message on the remote’s display․
System Menu Navigation
Accessing the System Menu is crucial for configuring and managing your i-Pilot remote․ Press the “Home” button to initiate access․ Utilize the up and down arrow buttons to scroll through the various menu options displayed on the screen․
Select a desired option by pressing the “OK” (checkmark) button․ To return to the previous menu, press the “Menu” or “Back” button․ Familiarize yourself with the menu structure for efficient operation and customization of your i-Pilot system;
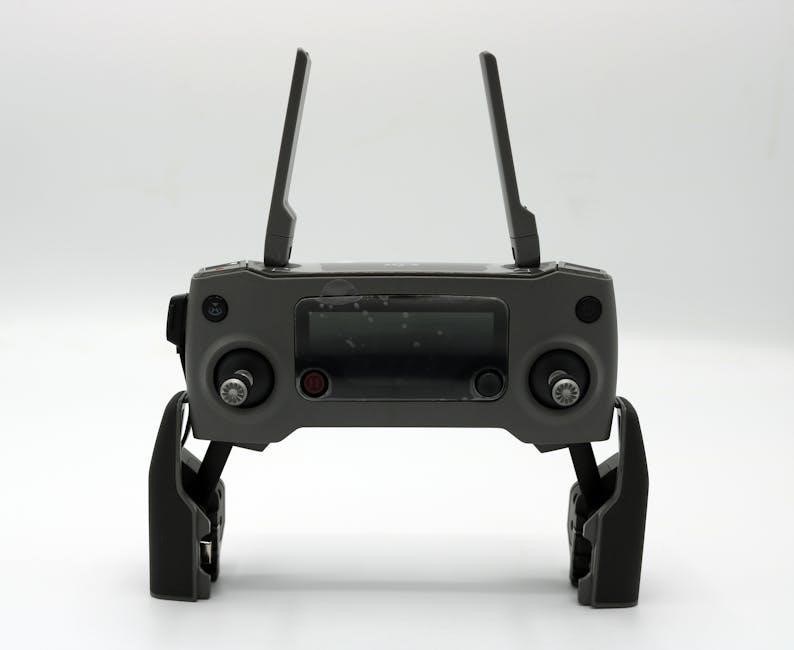
Understanding the Remote Interface
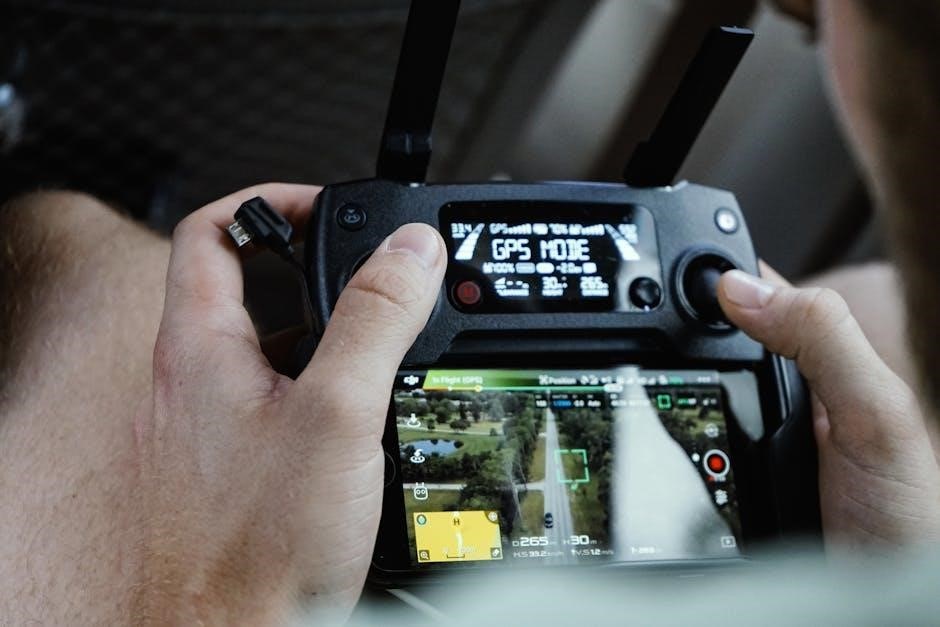
The i-Pilot remote features a user-friendly interface designed for intuitive control․ The display screen provides vital information, including speed, battery level, and selected mode․ Key buttons offer direct access to steering, speed adjustments, and advanced features like Autopilot and Spot-Lock․
Indicators clearly communicate system status․ Understanding the layout and function of each element ensures efficient operation and maximizes your control over the Minn Kota motor․
Key Buttons and Their Functions
The Home button powers the i-Pilot remote on and off, accessing the main menu․ Up/Down arrows navigate the System Menu, while OK (checkmark) selects options․ Steering buttons control direction, and speed buttons adjust propulsion․
Momentary/Continuous speed control toggles offer flexibility․ The Remote Lock button enhances security․ Familiarizing yourself with each button’s function is crucial for seamless operation and maximizing the i-Pilot system’s capabilities․
Display Screen Indicators
The i-Pilot remote’s display screen provides vital information․ Battery level is prominently shown, ensuring uninterrupted use․ Spot-Lock status indicates active circling, displaying radius and engaged status․ Autopilot mode is clearly indicated when activated․
Speed settings are numerically displayed, alongside directional arrows․ Connectivity icons confirm the link with the motor․ Understanding these indicators allows for informed operation and quick troubleshooting, enhancing your on-water experience․
Menu Options Overview
The i-Pilot system menu offers extensive customization․ System settings allow for unit adjustments and language selection․ Spot-Lock options refine radius and jog settings․ Autopilot configurations enable course adjustments and sensitivity control;
Remote Lock settings manage security features․ Software updates ensure optimal performance․ Navigating these options unlocks the full potential of your i-Pilot remote, tailoring it to your specific fishing needs and preferences for a seamless experience․
Basic Operation: Steering and Speed Control
Steering is intuitive: use the directional buttons to guide your boat․ Speed control is managed via the up/down buttons, offering precise adjustments․ Momentary speed control provides temporary bursts, while continuous speed maintains a set pace․
Experiment with settings to find your ideal speed for various conditions․ The remote’s responsiveness ensures accurate maneuvering, enhancing your control and allowing for focused fishing․ Mastering these basics unlocks efficient boat handling․
Steering Your Boat with the Remote
Directional control is achieved using the intuitive arrow buttons on the i-Pilot remote․ Pressing these buttons initiates smooth turns, allowing for precise boat positioning․ Small adjustments are ideal for navigating tight spaces, while longer presses result in wider arcs․
Practice makes perfect – familiarize yourself with the remote’s responsiveness․ Combine steering with speed control for optimal maneuverability, ensuring you can effortlessly navigate to your desired fishing spot․
Adjusting Speed Settings
The i-Pilot remote offers granular speed control, crucial for various fishing techniques․ Utilize the up and down arrow buttons within the speed menu to select from multiple speed settings․ Lower speeds are ideal for precise positioning and trolling, while higher speeds facilitate quicker travel between spots․
Experiment with different settings to find what works best for your boat and fishing style․ Remember to adjust speed based on wind and current conditions for optimal control․
Using the Momentary and Continuous Speed Controls

The i-Pilot remote features two speed control modes: momentary and continuous․ Momentary speed, activated by holding the speed button, provides temporary speed adjustments – release the button to return to the previously set speed․ Continuous speed, engaged by tapping the speed button, locks in a chosen speed until altered․
Utilize momentary control for quick bursts or subtle adjustments, and continuous control for maintaining a consistent speed during long runs or trolling․ Mastering both modes enhances your boat control precision․
Advanced Features: Autopilot and Spot-Lock
The i-Pilot remote unlocks advanced features like Autopilot and Spot-Lock, revolutionizing boat control․ Autopilot maintains a pre-set course and speed, freeing you to focus on fishing․ Spot-Lock utilizes GPS to hold your boat in a precise location, countering wind and current․
These features dramatically improve fishing efficiency and accuracy․ Explore the menu to customize settings and optimize performance for various fishing scenarios․ Spot-Lock radius can be adjusted for different conditions․
Activating and Using Autopilot
To activate Autopilot, navigate to the Autopilot option within the i-Pilot remote’s system menu․ Select your desired heading and speed using the directional buttons and speed controls․ Confirm your settings with the OK button to engage Autopilot․
The system will automatically steer and maintain your chosen course․ Adjust heading and speed at any time using the remote․ Disengage Autopilot by pressing the Home button or manually steering the motor․

Understanding and Utilizing Spot-Lock
Spot-Lock is a revolutionary feature allowing your boat to remain anchored in a specific location, even in wind or current․ Activate Spot-Lock by pressing the Spot-Lock button on the i-Pilot remote․ The system uses GPS to maintain position․
Before activating, ensure a strong GPS signal․ Adjust the Spot-Lock radius to define the area of operation․ Spot-Lock is ideal for precise fishing and holding position while rigging or baiting․
Setting Spot-Lock Radius
Adjusting the Spot-Lock radius is crucial for optimal performance․ Use the up/down buttons on the i-Pilot remote while in the Spot-Lock menu to modify the radius․ A smaller radius provides greater precision, ideal for calm conditions․
A larger radius allows for more movement, suitable for wind or current․ Consider your surroundings and fishing technique when selecting a radius․ Experiment to find the setting that best suits your needs and ensures effective boat control․
Remote Lock Functionality
Remote Lock is a security feature preventing unauthorized use of your Minn Kota motor․ Activate it through the System Menu on the i-Pilot remote․ When enabled, the motor cannot be controlled without the paired remote․
This deters theft and accidental operation․ Remember your PIN if prompted․ Deactivate Remote Lock when you need to share control or perform maintenance․ Prioritize security while enjoying the convenience of your i-Pilot system․
Utilizing the Remote Lock Feature
To engage Remote Lock, navigate to the “Security” section within the i-Pilot System Menu․ Select “Remote Lock” and follow the on-screen prompts, potentially requiring a PIN setup․ Confirm activation; the remote will indicate a locked status․
To unlock, re-enter your PIN on the remote․ Ensure a strong PIN for maximum security․ Regularly test the lock/unlock functionality․ Remember, unauthorized access is prevented when Remote Lock is active, safeguarding your investment․
Security Benefits of Remote Lock
Remote Lock significantly enhances security, preventing unauthorized operation of your Minn Kota motor․ It deters theft and accidental activation, especially crucial during storage or in public areas․ PIN protection adds an extra layer, requiring a unique code for access․
This feature is vital for peace of mind, safeguarding your valuable equipment․ Remote Lock minimizes the risk of unintended use, protecting both your boat and others nearby․ Regular use is recommended for optimal security․
Troubleshooting Common Issues
If the remote isn’t connecting, ensure it’s charged and within range of the motor․ Try re-pairing the devices following the initial setup instructions․ Display screen problems often resolve with a reset – check the user manual․
If the motor isn’t responding, verify the battery connections and remote lock isn’t activated․ Consult the Minn Kota website for FAQs and support․ Software updates can also fix glitches; ensure your firmware is current․
Remote Not Connecting
If your i-Pilot remote fails to connect, first confirm it has sufficient battery charge․ Ensure the remote is within range of the Minn Kota motor – obstructions can interfere․ Attempt re-pairing the devices by navigating to the System Menu and selecting the pairing option․
Check for interference from other electronic devices․ A remote reset might also resolve connectivity issues․ Refer to the Minn Kota support website for detailed troubleshooting steps and FAQs․
Display Screen Problems
If the i-Pilot remote display is blank or malfunctioning, initially check the battery level – a low charge can cause display issues․ Try a hard reset by holding the power button for an extended period․ Inspect the screen for physical damage, such as cracks․
Ensure the remote isn’t exposed to extreme temperatures or direct sunlight for prolonged periods․ Contact Minn Kota support if the problem persists, as it may indicate an internal hardware failure requiring repair or replacement․
Motor Not Responding to Remote Commands
If your Minn Kota motor isn’t responding, first verify the remote is properly paired․ Confirm the motor has sufficient battery power and the power switch is on․ Check the propeller for obstructions like weeds or fishing line․
Ensure the remote is within range and there’s no interference․ Try re-pairing the remote to the motor․ If issues continue, consult the Minn Kota troubleshooting guide or contact their customer support for further assistance․
Battery Management and Charging
Maintaining your i-Pilot remote’s battery is crucial for reliable operation․ Regularly check the battery level via the display screen․ When the battery is low, use the provided charging cable and a compatible USB power source․
Avoid overcharging the battery to prolong its lifespan․ Store the remote in a cool, dry place when not in use․ Consider carrying a portable power bank for extended trips to ensure uninterrupted functionality․
Checking the Remote Battery Level
The i-Pilot remote displays its remaining battery life directly on the screen․ Navigate to the System Menu using the up/down buttons, then select “Battery” with the OK button․ A battery icon indicates the charge level, ranging from full to low․
Pay attention to low battery warnings and initiate charging promptly․ Consistent monitoring prevents unexpected power loss during operation․ Remember that battery life can vary based on usage and environmental conditions․
Charging the i-Pilot Remote
To charge your i-Pilot remote, locate the charging port, typically a micro-USB or USB-C connection․ Use the provided charging cable and connect it to a suitable USB power source․ A charging indicator on the screen will illuminate, showing the charging progress․
Allow several hours for a full charge․ Avoid using the remote while it’s charging․ Disconnect the charger once the battery is full to prolong battery health․ Regular charging ensures reliable performance on the water․
Extending Battery Life
Maximize your i-Pilot remote’s battery life by adjusting screen brightness to the lowest comfortable level․ Disable unnecessary features when not in use, such as Bluetooth if not connected to a fishfinder․ Store the remote in a cool, dry place when not in use, avoiding extreme temperatures․
Fully charge the remote before each fishing trip; Consider carrying a portable power bank for extended outings․ Avoid deep discharges by recharging when the battery is low, but not completely depleted․
i-Pilot Remote Compatibility
The i-Pilot remote is primarily compatible with Minn Kota electric trolling motors featuring i-Pilot or i-Pilot Link technology․ Specific compatible models include various Ultrex, Terrova, and Riptide models – check Minn Kota’s website for a complete list․
Seamless integration is available with Humminbird fishfinders via the OneBoat Network, enabling shared sonar and GPS data․ Ensure your Humminbird is also networked for full functionality․ Compatibility may vary based on model year and software versions․
Compatible Minn Kota Motor Models
The i-Pilot remote functions with a range of Minn Kota trolling motors․ Key compatible series include the Ultrex, renowned for its precision and power, and the Terrova, offering integrated GPS and autopilot․ Riptide models, designed for saltwater environments, also support i-Pilot functionality․
Older models like the PowerDrive may require specific i-Pilot adapters․ Always verify compatibility using Minn Kota’s online resources or by contacting their customer support․ Ensure your motor has the necessary i-Pilot interface for seamless connection․

Compatibility with Humminbird Fishfinders
The i-Pilot system seamlessly integrates with Humminbird fishfinders, enhancing the on-water experience․ This connection allows for shared data, displaying i-Pilot information – like Spot-Lock location and autopilot status – directly on your Humminbird unit․
Compatibility requires a networked connection via NMEA 2000․ Ensure both your i-Pilot motor and Humminbird fishfinder are connected to a compatible NMEA 2000 network․ This integration provides a centralized view of crucial boating and fishing data․
OneBoat Network Integration
The i-Pilot system is a key component of the OneBoat Network, a revolutionary platform connecting Minn Kota, Humminbird, and Cannon products․ This integration allows for a unified and streamlined boating experience, sharing data between devices․
Through the OneBoat Network, you can control i-Pilot features from your Humminbird fishfinder, and vice versa․ Enjoy synchronized mapping, sonar, and motor control for enhanced efficiency․ Seamless connectivity simplifies operation and provides a comprehensive view of your marine environment․
Safety Precautions
Always operate the i-Pilot remote responsibly and be aware of your surroundings․ Maintain a safe distance from other boats, swimmers, and obstacles while using autopilot or Spot-Lock features․ Familiarize yourself with the emergency stop procedures, readily accessible on the remote and motor itself․
Never rely solely on the i-Pilot system; maintain constant vigilance and be prepared to manually control the motor if needed․ Ensure the remote is securely stored when not in use to prevent accidental activation; Prioritize safety for yourself and others on the water․
Operating the Remote Responsibly
Exercise caution and common sense when utilizing the i-Pilot remote․ Avoid distractions while operating the system, focusing on your surroundings and potential hazards․ Be mindful of local boating regulations and speed limits, adjusting settings accordingly․ Respect other anglers and boaters, maintaining a courteous distance․
Never operate the remote under the influence of alcohol or drugs; Regularly inspect the remote for damage and ensure all functions operate correctly․ Prioritize safe boating practices and responsible remote operation for an enjoyable experience․

Emergency Stop Procedures
In an emergency, immediately release the throttle and depress the foot pedal to disengage the motor․ Alternatively, quickly press and hold the ‘Off’ button on the i-Pilot remote․ Be prepared to manually steer the boat if necessary, utilizing the trolling motor head․
Familiarize yourself with the motor’s emergency shut-off procedures before operation․ Ensure passengers are aware of these procedures as well․ Maintain a clear understanding of your surroundings and potential hazards to react swiftly in critical situations․
Maintaining a Safe Distance
Always maintain a safe distance from other boats, swimmers, docks, and obstructions while operating with the i-Pilot remote․ Be mindful of your surroundings and adjust speed accordingly․ Utilize Spot-Lock cautiously in crowded areas, ensuring sufficient clearance․
Never rely solely on the i-Pilot system; remain vigilant and prepared to take manual control․ Observe all local boating regulations and maintain a responsible speed․ Prioritize safety and awareness to prevent collisions and ensure a positive boating experience․
Remote Updates and Firmware
Regularly check for software updates to your i-Pilot remote via the OneBoat app or Minn Kota website․ Updating firmware ensures optimal performance, bug fixes, and access to new features․ Keeping your remote current enhances compatibility with Humminbird fishfinders and the OneBoat network․
Follow the on-screen prompts carefully during the update process․ Avoid interrupting the update, as this could damage the remote․ Updated firmware contributes to a smoother, more reliable i-Pilot experience, maximizing your time on the water․
Checking for Software Updates
To check for updates, connect your i-Pilot remote to the OneBoat network through the app on your smartphone or tablet․ Navigate to the “Remote Software Update” section within the app’s settings․ The system will automatically scan for available firmware versions․
If an update is available, a notification will appear․ Follow the on-screen instructions to begin the download and installation process․ Regularly checking ensures your remote has the latest improvements and features․
Updating the Remote Firmware
Initiate the firmware update through the OneBoat app after confirming availability․ Ensure the remote has sufficient battery life – a minimum of 50% is recommended – and remains connected during the entire process․ Do not interrupt the update; avoid powering off the remote or disconnecting it․
The app will display a progress bar indicating the update’s status․ Once completed, the remote will automatically restart․ Verify the new firmware version in the system settings to confirm a successful update․
Benefits of Keeping Firmware Updated
Regular firmware updates enhance the i-Pilot remote’s performance and stability, resolving potential bugs and improving overall system responsiveness․ New versions often introduce feature enhancements, expanding functionality and optimizing existing features like Spot-Lock and Autopilot․
Updates also ensure compatibility with the latest Minn Kota motor models and Humminbird fishfinders, maximizing integration within the OneBoat network․ Maintaining current firmware safeguards against security vulnerabilities and ensures a seamless user experience․
Care and Maintenance
Proper care extends the life of your i-Pilot remote․ Regularly clean the device with a soft, damp cloth, avoiding harsh chemicals or abrasives․ Store the remote in a dry, protected location when not in use, shielding it from extreme temperatures and direct sunlight․
Protect against physical damage by avoiding drops and impacts․ Inspect the charging port for debris and ensure a secure connection during charging․ Following these simple steps ensures reliable performance for years to come․

Cleaning the Remote
To clean your i-Pilot remote, begin by powering it off․ Use a soft, slightly damp cloth to wipe down the exterior surfaces, removing any dirt, grime, or saltwater residue․ Avoid abrasive cleaners or solvents, as these can damage the screen and housing․
Pay attention to the buttons and crevices, ensuring they are free of debris; Never submerge the remote in water․ A gentle cleaning routine after each use will maintain optimal performance and longevity․
Storing the Remote Properly
Proper storage extends the life of your i-Pilot remote․ When not in use, store the remote in a cool, dry place, away from direct sunlight and extreme temperatures․ Avoid storing it with sharp objects that could scratch the screen or damage the housing․
A dedicated storage case is recommended for protection․ Ensure the remote is completely dry before storing to prevent corrosion․ Keep it out of reach of children and pets for safe keeping․
Protecting the Remote from Damage
Protecting your i-Pilot remote is crucial for longevity․ Avoid dropping the remote, as internal components are sensitive to impact․ Shield it from water exposure – while splash-resistant, prolonged submersion can cause failure․ Regularly inspect the screen for scratches and the housing for cracks․
Consider a protective case or sleeve during transport and use․ Avoid exposing the remote to harsh chemicals or cleaning agents․ Handle with care to prevent accidental damage and maintain functionality․
Leave a Reply
You must be logged in to post a comment.